| | mk2 golf mtdi build-daily to be |  |
|
+21nelds shippy666 jim-uk16 mark-1vw BenxK todd Pistacheuro Lupton_20vt tomstanforster CustomChris 69rat billybug hoopster Tiz caddyman bridgedubber MK1G60 VW Mike CaddyRage matty_mk1 curtis_caddy 25 posters |
|
| Author | Message |
|---|
VW Mike
Moderator

 Number of posts : 2138 Number of posts : 2138
Age : 40
Location : Ramsey
Drives : LWB T5 and 69 bug - we will see who is fastest on the strip hey Mark ;)
Registration date : 2008-01-18
 |  Subject: Re: mk2 golf mtdi build-daily to be Subject: Re: mk2 golf mtdi build-daily to be  Thu Mar 29 2012, 06:36 Thu Mar 29 2012, 06:36 | |
| I'm disappointed you didn't go for pink dude :( | |
|
  | |
curtis_caddy
 Number of posts : 3070 Number of posts : 3070
Age : 33
Location : duxford
Drives : mk2 driver
Registration date : 2008-02-03
 |  Subject: Re: mk2 golf mtdi build-daily to be Subject: Re: mk2 golf mtdi build-daily to be  Thu Mar 29 2012, 19:15 Thu Mar 29 2012, 19:15 | |
| sorry man  would have set the black and silver off nice that! so thought i would post some sneaky pics of what im up to instead of the golf, more to come of the "car" there going on after the hectic weekend planned. before 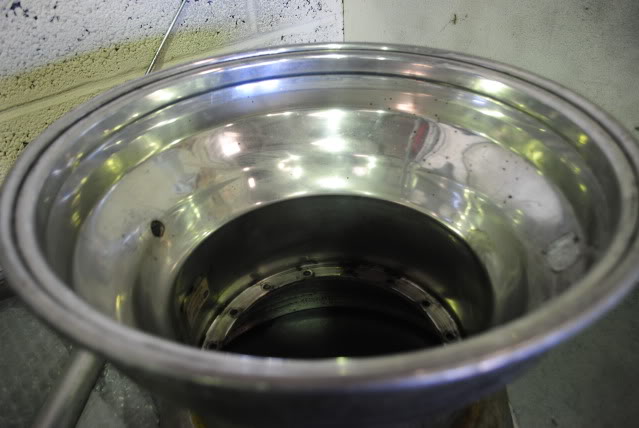 after 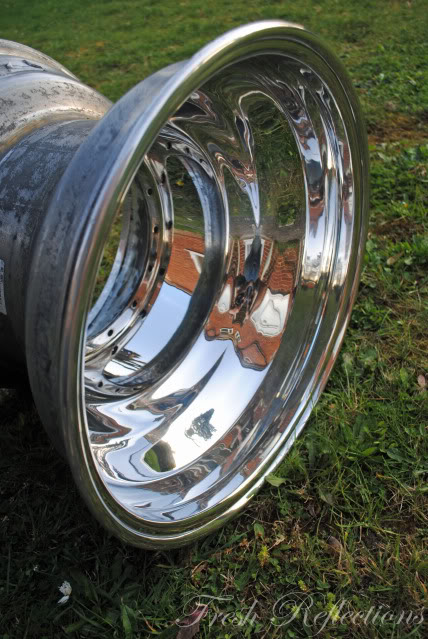 | |
|
  | |
jim-uk16

 Number of posts : 599 Number of posts : 599
Age : 48
Location : Germany baby!!
Drives : 83 MK1, Octavia Workhorse and general chum's carrier pigeon
Registration date : 2009-08-15
 |  Subject: Re: mk2 golf mtdi build-daily to be Subject: Re: mk2 golf mtdi build-daily to be  Tue Apr 17 2012, 19:52 Tue Apr 17 2012, 19:52 | |
| I'm seriously starting to worry about you joe.....what started as a daily has gone waaaaay too far!!  And every part ive brought over to you, you've cut, welded, trimmed!! is any of it left? looking bang on though mate, i'll bring your interior trim over this week  | |
|
  | |
curtis_caddy

 Number of posts : 3070 Number of posts : 3070
Age : 33
Location : duxford
Drives : mk2 driver
Registration date : 2008-02-03
 |  Subject: Re: mk2 golf mtdi build-daily to be Subject: Re: mk2 golf mtdi build-daily to be  Wed Apr 25 2012, 06:35 Wed Apr 25 2012, 06:35 | |
| not updated this in an age, have been super busy with peoples wheels etc. been chipping away with this but not bothered to update it, got to the stage i have a few pics to show something pretty good. gearbox shifter mech all split, masked blasted and painted as per usual    pd passat inlet manfiold, blanked and soaked in fairy power spray for a week. turned all the diesel crud to slop so i could clean it out better 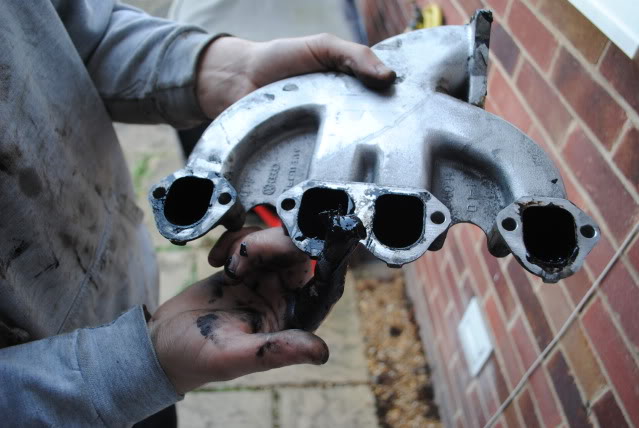  next onto the turbo, dan the man once again come through and got the stud out, so i could continue with the next stages.  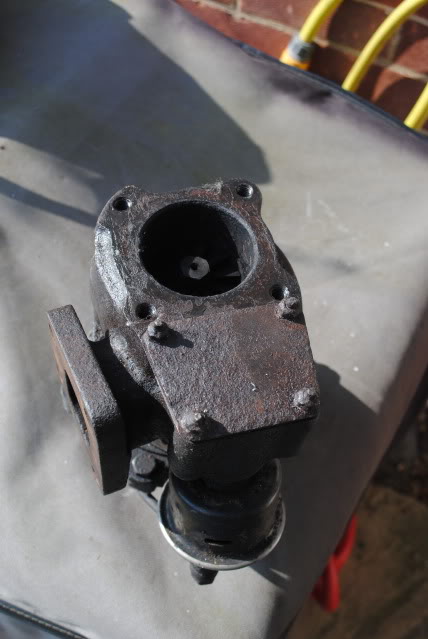 turbo and inlet ready for blasting 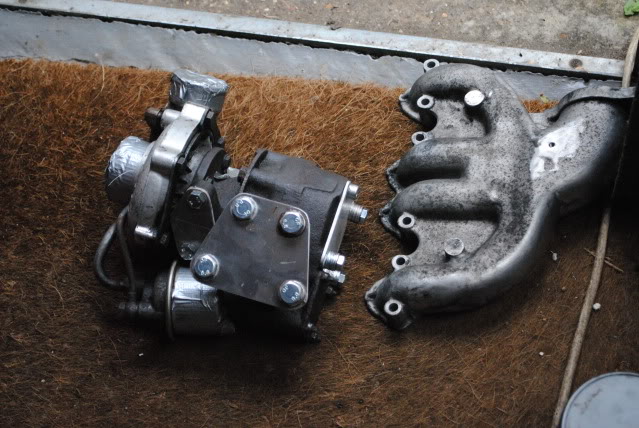 turbo lightly blasted to get the lumpy rust bits off, then a few little bits taken off and masked  cold side painted in heat silver 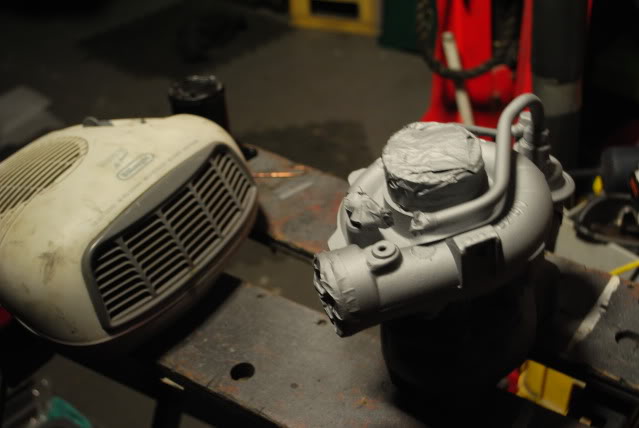 jodie spent her day off helping too, got loads done so great success! she back masked the cold side then painted the hot side heat black 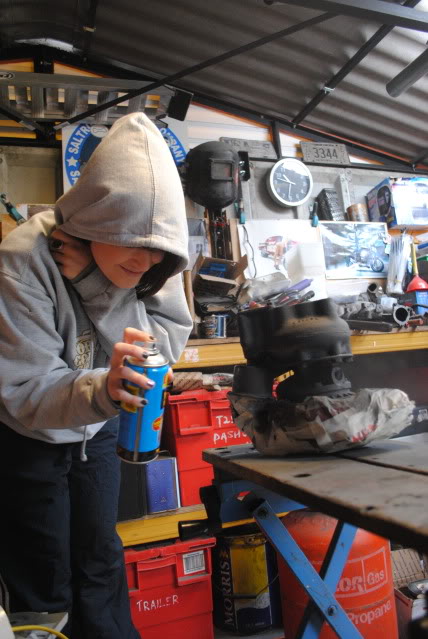 she then blasted and painted a few bits that hold the oil pipe on the turbo   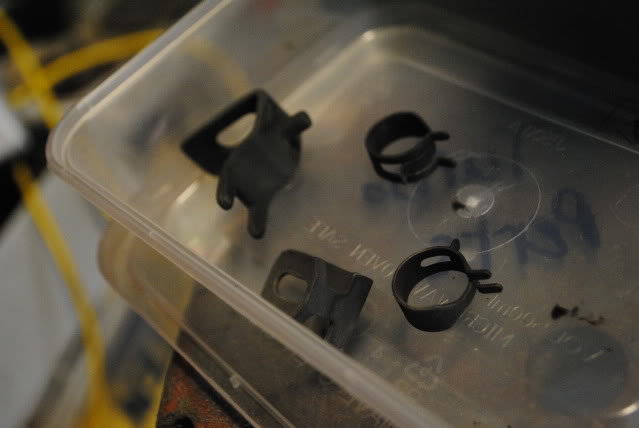 then back in one piece, really pleased with this! 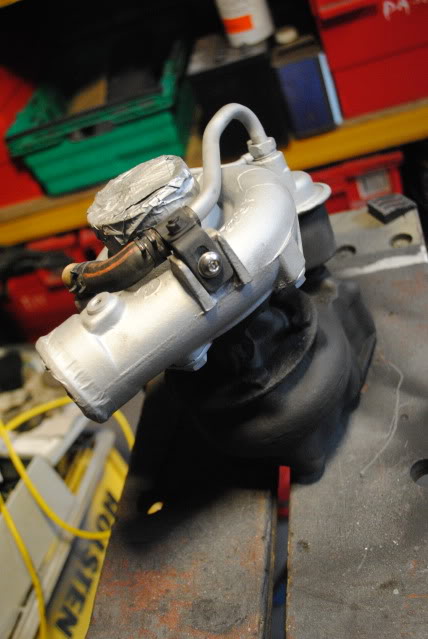 inlet mani, egr, exhasut mani, gaskets, new studs, bolts and nuts ready to all go on. its all bolted up now but got to dark for photos 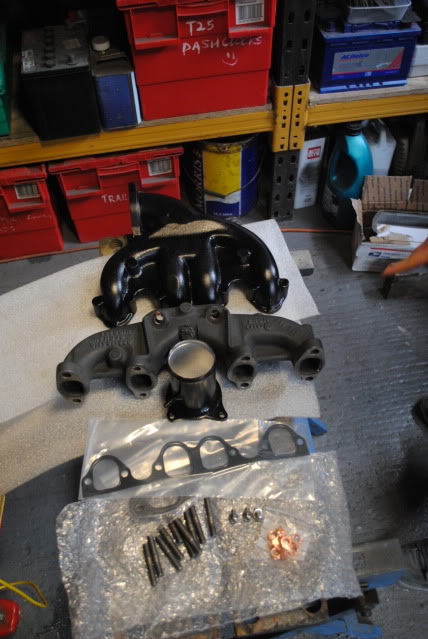 down pipe parts came, 3 90degree bends, meter of tube, flexi piece, 10m of heat wrap in black and some nice stainless fancy cable ties  cut up, tacked and test fitted again 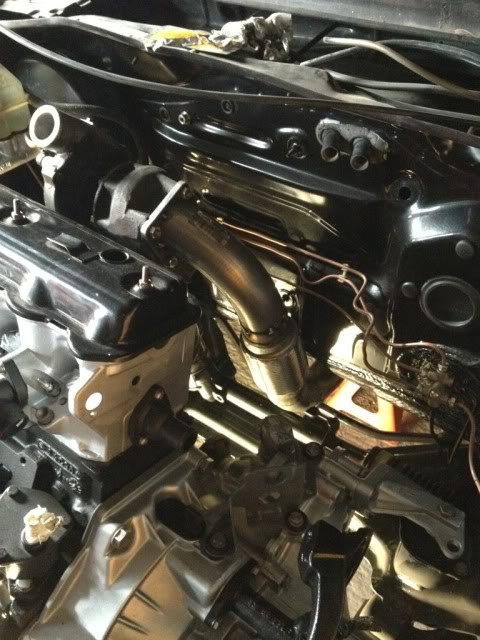 back off for all teh above to happen to the turbo etc, so the down pipe got several coats of heat black then heat wrapped the next day  | |
|
  | |
CaddyRage
Admin

 Number of posts : 6348 Number of posts : 6348
Age : 43
Location : Ellington, near Huntingdon, cambs
Drives : T4 2.5tdi daily, 83 mk1 golf gti 16v, 92 mk1 Caddy project
Registration date : 2007-12-29
 |  Subject: Re: mk2 golf mtdi build-daily to be Subject: Re: mk2 golf mtdi build-daily to be  Wed Apr 25 2012, 08:44 Wed Apr 25 2012, 08:44 | |
| | |
|
  | |
Lupton_20vt

 Number of posts : 6815 Number of posts : 6815
Age : 34
Registration date : 2009-02-01
 |  Subject: Re: mk2 golf mtdi build-daily to be Subject: Re: mk2 golf mtdi build-daily to be  Wed Apr 25 2012, 10:53 Wed Apr 25 2012, 10:53 | |
| Solid progress there Joe.  Is that an allard egr delete? | |
|
  | |
curtis_caddy

 Number of posts : 3070 Number of posts : 3070
Age : 33
Location : duxford
Drives : mk2 driver
Registration date : 2008-02-03
 |  Subject: Re: mk2 golf mtdi build-daily to be Subject: Re: mk2 golf mtdi build-daily to be  Wed Apr 25 2012, 10:56 Wed Apr 25 2012, 10:56 | |
| Cheers chaps  More samco ordered for boost pipes and turbo No Chris I made it, with spout for my landy pump  | |
|
  | |
Lupton_20vt

 Number of posts : 6815 Number of posts : 6815
Age : 34
Registration date : 2009-02-01
 |  Subject: Re: mk2 golf mtdi build-daily to be Subject: Re: mk2 golf mtdi build-daily to be  Wed Apr 25 2012, 10:57 Wed Apr 25 2012, 10:57 | |
| | |
|
  | |
curtis_caddy

 Number of posts : 3070 Number of posts : 3070
Age : 33
Location : duxford
Drives : mk2 driver
Registration date : 2008-02-03
 | |
  | |
caddyman

Number of posts : 1127
Age : 44
Location : sawston
Registration date : 2008-01-20
 |  Subject: Re: mk2 golf mtdi build-daily to be Subject: Re: mk2 golf mtdi build-daily to be  Thu Apr 26 2012, 08:42 Thu Apr 26 2012, 08:42 | |
| spot on dude must pop ova at weekend in the new weapon and drop your bits off to lol  | |
|
  | |
curtis_caddy

 Number of posts : 3070 Number of posts : 3070
Age : 33
Location : duxford
Drives : mk2 driver
Registration date : 2008-02-03
 |  Subject: Re: mk2 golf mtdi build-daily to be Subject: Re: mk2 golf mtdi build-daily to be  Sun May 13 2012, 09:55 Sun May 13 2012, 09:55 | |
| few from yesterday, havent updated really as been pretty busy with work and other peoples stuff. thought i would update in bulk once i made progress. one boost pipe made, more plans and ideas thrown about with the lads about breathers and header tanks, so will show those once there complete too, so all of a sudden everything should just fall together, right?  so go back a few weeks, i had my pump sent off and rebuilt inside and out, i roughly blasted it first before it went thinking paint it when it come back but it come back perfect! brand new like everything else! before 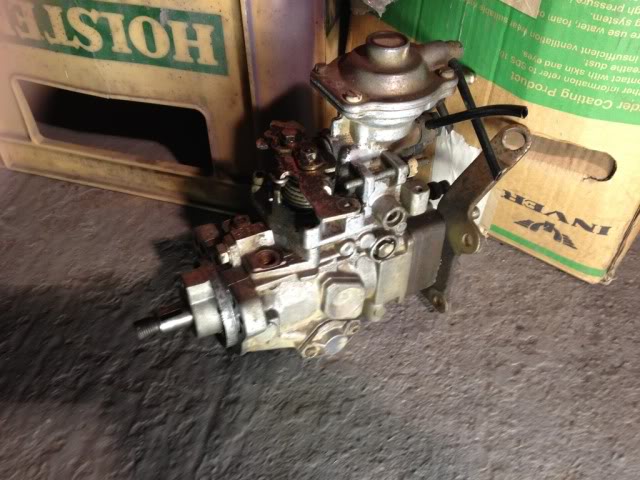 after 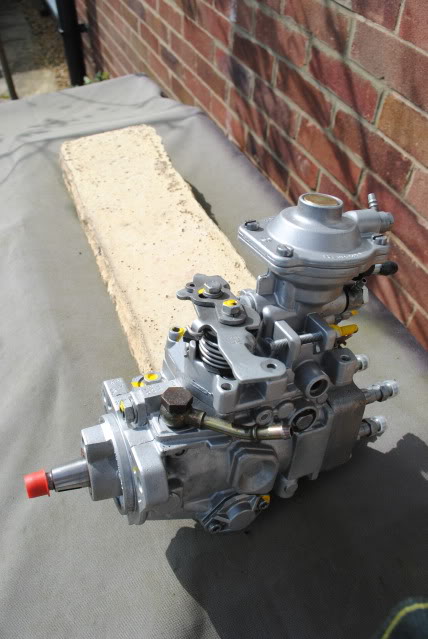 also steve kindly done a very firendly price on the quick shift mk3 kit out of his mk2 that sadly killed itself! so after replacing the hole bushes and linkages for the shifter with new items i took it back apart again, dont think i put pictures up from the other week when i done this so it doesnt look like ive gone backwards too much! good comparison of the stock and after market kit  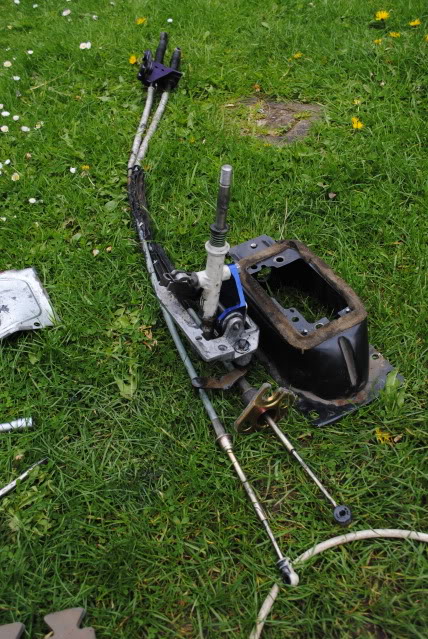 bump bracket adapted ages ago by dan, blasted and painted after another meeting with the grinder to make my cam belt cover fit so had to repaint that again too. backing plate finally fully welded, blasted and painted too.  pump on 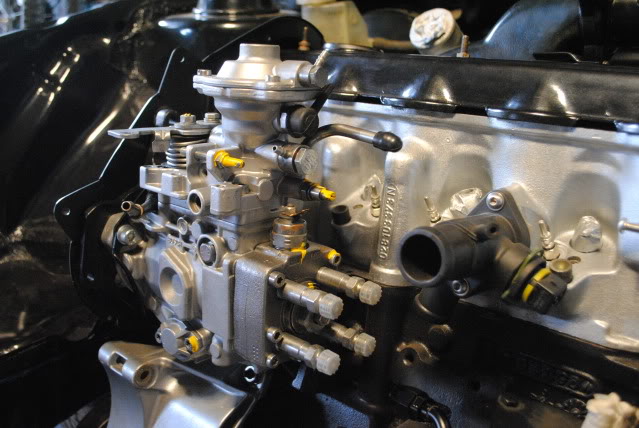 before i start i must say the idea of this in basic terms was from chris, so im sure he will take credit for the mounting positioning. so thanks to chris! so with basics mapped out quick drawing and took it into work to speed the process up, onto some 3mm alloy, quickly rough cut the outside edge, and holes drilled.  inside edge took out with a punch and die on a fly press, serious arm ache after this bit!  filed and sanded to shape, checked with drawing. unsure why but it looks a lot bigger that the drawing!  top and bootom H sections cut and sanded (less work to brush finish it if the starting point is better) 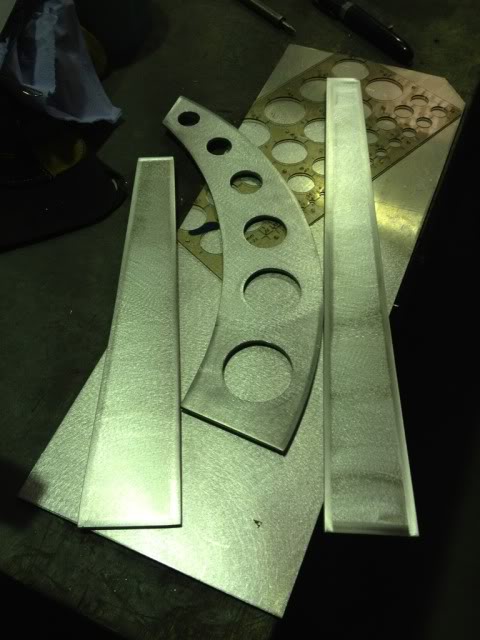 then tacked up to the picture i posted in the week, can see how big it actualy is next to the relentless can 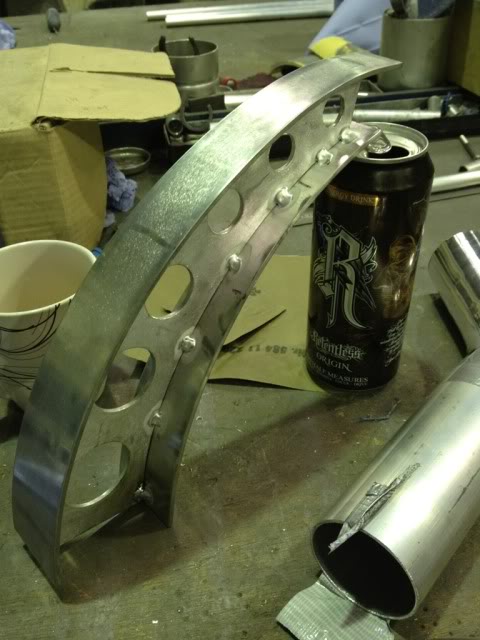 with that dont time to work on the cable splitter/holder. so stu let me pinch a bit of his jig for his aviation chassis so that saved me buying some. mapped out 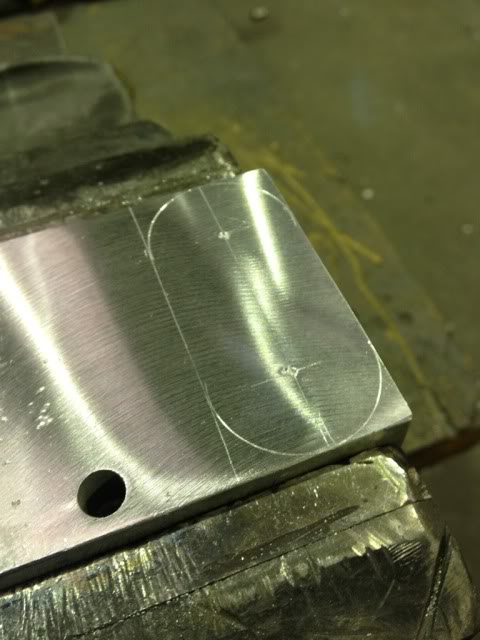 drilled  cut of the lump 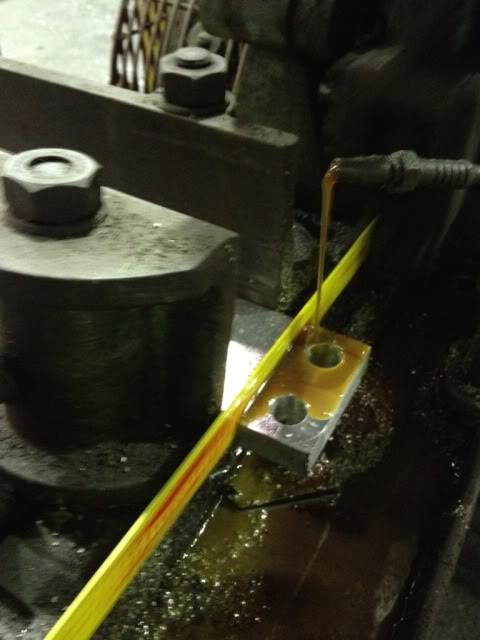 side hole drilled, next the sides were cut off with the grinder, roughly shaped then refined on the circular sander to correct shape.   file wrapped in sand paper to take the hard marks from the sander out, then finished with scotchbrite  the most worrying part, cutting it up 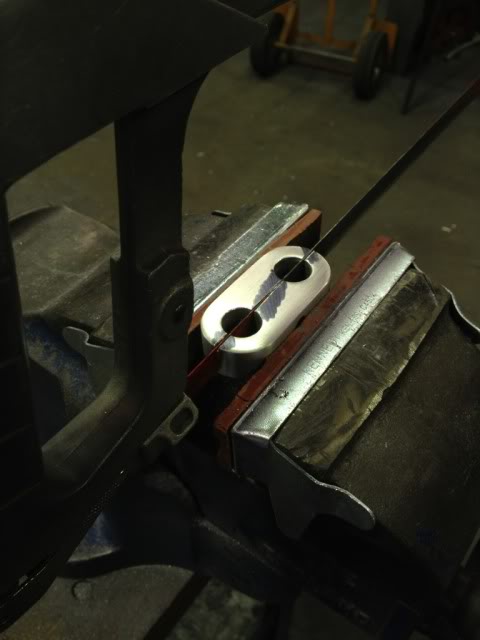 laptop just frozen, more pictures in 5! cut in half 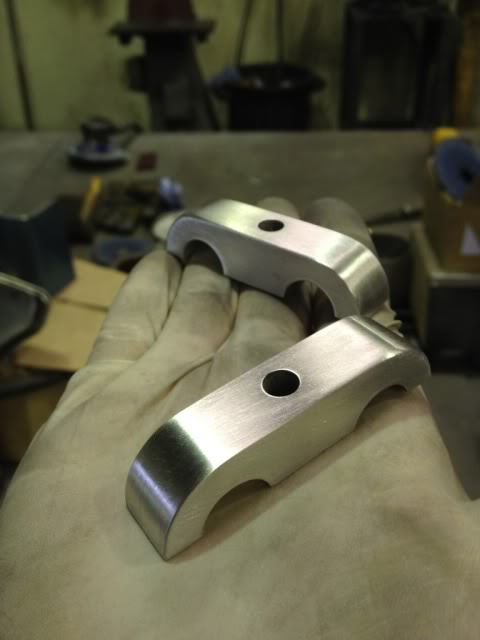 layed out to see how it is doing for size 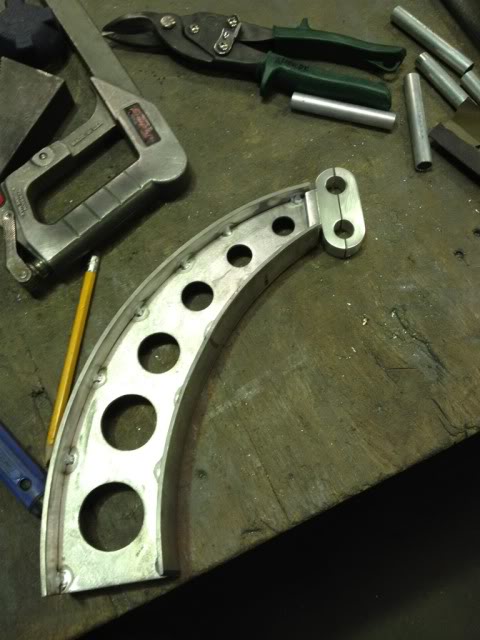 so whats it for im sure a few thing think? it holds the shifter cables away from the down pipe. the down pipe i made runs right where the cables wanted to go! so nice flow on the zorst and make the cables work around it was the plan. so if you read the thread i made my own shifter tower so cables HAVE to go through the fire wall. if i was running a stock set up im sure i could have done away with all this but theres no fun in that! so holes in the fire wall drilled, more pics of how it all works next week once the shifter is in the car too i hope   it all bolts down onto the holes in the stearing rack for the rod change set up for the rod change boxes.  | |
|
  | |
caddyman

Number of posts : 1127
Age : 44
Location : sawston
Registration date : 2008-01-20
 |  Subject: Re: mk2 golf mtdi build-daily to be Subject: Re: mk2 golf mtdi build-daily to be  Sun May 13 2012, 16:22 Sun May 13 2012, 16:22 | |
| im in love dam you lol i feel another project coming on lol | |
|
  | |
billybug

 Number of posts : 4530 Number of posts : 4530
Age : 35
Location : Ontario, Canada
Drives : 1993 Mk3 Golf
Registration date : 2008-06-30
 |  Subject: Re: mk2 golf mtdi build-daily to be Subject: Re: mk2 golf mtdi build-daily to be  Wed May 23 2012, 08:08 Wed May 23 2012, 08:08 | |
| this progress is amazing! | |
|
  | |
curtis_caddy

 Number of posts : 3070 Number of posts : 3070
Age : 33
Location : duxford
Drives : mk2 driver
Registration date : 2008-02-03
 |  Subject: Re: mk2 golf mtdi build-daily to be Subject: Re: mk2 golf mtdi build-daily to be  Wed May 23 2012, 08:11 Wed May 23 2012, 08:11 | |
| | |
|
  | |
MK1G60
Admin

 Number of posts : 1015 Number of posts : 1015
Age : 44
Location : GMC
Drives : MK1 ABF Bike Carbd, MK1 G60/20vt Project, MK1 Caddy 1.6D
Registration date : 2009-08-01
 |  Subject: Re: mk2 golf mtdi build-daily to be Subject: Re: mk2 golf mtdi build-daily to be  Wed May 23 2012, 18:03 Wed May 23 2012, 18:03 | |
| | |
|
  | |
curtis_caddy

 Number of posts : 3070 Number of posts : 3070
Age : 33
Location : duxford
Drives : mk2 driver
Registration date : 2008-02-03
 |  Subject: Re: mk2 golf mtdi build-daily to be Subject: Re: mk2 golf mtdi build-daily to be  Thu Aug 02 2012, 18:49 Thu Aug 02 2012, 18:49 | |
| decided i wasnt going to update this until it was completely done, changed my camera a couple weeks back and lost all my bloody photos since i last update, was nearly 100 a lost! so bit gutted as ive done loads since! biggest hold up was sorting a turbo after finding out the t3 was pretty worn out, so decided to go big or go home.  turbo turbo by the pinstriper, on Flickr so dan made an adaptor for the turbo last week, nice alloy mock up jobby as we new it would need sorting. version two should be sorted tomo so i can cut up my down pipe and sort that then all back apart again, down pipe and zorst manifold are getting ceramic coating then will re heat wrap the down pipe just for the nicer look as the coating will keep temps down more than the wrap. should all being well be at edition with this! caddy mans teve got most of my interior back in at the weekend too, was like a mobile shed before but i held him up as i hadnt got all my side of things done! morfe pics soon...  shifter shifter by the pinstriper, on Flickr | |
|
  | |
caddyman

Number of posts : 1127
Age : 44
Location : sawston
Registration date : 2008-01-20
 |  Subject: Re: mk2 golf mtdi build-daily to be Subject: Re: mk2 golf mtdi build-daily to be  Thu Aug 02 2012, 22:16 Thu Aug 02 2012, 22:16 | |
| you not finished that bloody shifter yet lol | |
|
  | |
ra man

 Number of posts : 119 Number of posts : 119
Age : 44
Location : Cambridge
Drives : mk2 20v, defender 90, ccm r30, yzf r6
Registration date : 2008-05-25
 |  Subject: Re: mk2 golf mtdi build-daily to be Subject: Re: mk2 golf mtdi build-daily to be  Fri Aug 03 2012, 13:41 Fri Aug 03 2012, 13:41 | |
| i'll be round tomorrow mate | |
|
  | |
caddyman

Number of posts : 1127
Age : 44
Location : sawston
Registration date : 2008-01-20
 |  Subject: Re: mk2 golf mtdi build-daily to be Subject: Re: mk2 golf mtdi build-daily to be  Fri Aug 03 2012, 14:33 Fri Aug 03 2012, 14:33 | |
| ra man it will be running tommorw then  you best get polishing josph lol | |
|
  | |
curtis_caddy

 Number of posts : 3070 Number of posts : 3070
Age : 33
Location : duxford
Drives : mk2 driver
Registration date : 2008-02-03
 |  Subject: Re: mk2 golf mtdi build-daily to be Subject: Re: mk2 golf mtdi build-daily to be  Sat Jan 12 2013, 09:56 Sat Jan 12 2013, 09:56 | |
| havent really done updates in order for ages, i thought i lost a few pics along the way when i got a new camera but the memory card seems to want to play ball so got a few back. so i will try and continue in some detailof what went on for this to just turn into a near finished car. skipping a few months back was the joys of wiring, luckily adam was nice enough to come over for a couple days over some weekends to chop up some looms to create my minimal bay loom, new fan loom to work off of an over ride switch thats in the shifter tower, and chop all teh unwanted bits out of the light looms. then he sepperated them into a few sections to run down either chassis leg and a few into the scuttle, so the engine loom runs down the drivers side leg with the light loom for that side, then teh right side has the light loom for this side, wiring for radiator temp sendor over ride loom and the battery lines which got put in the back of the car. 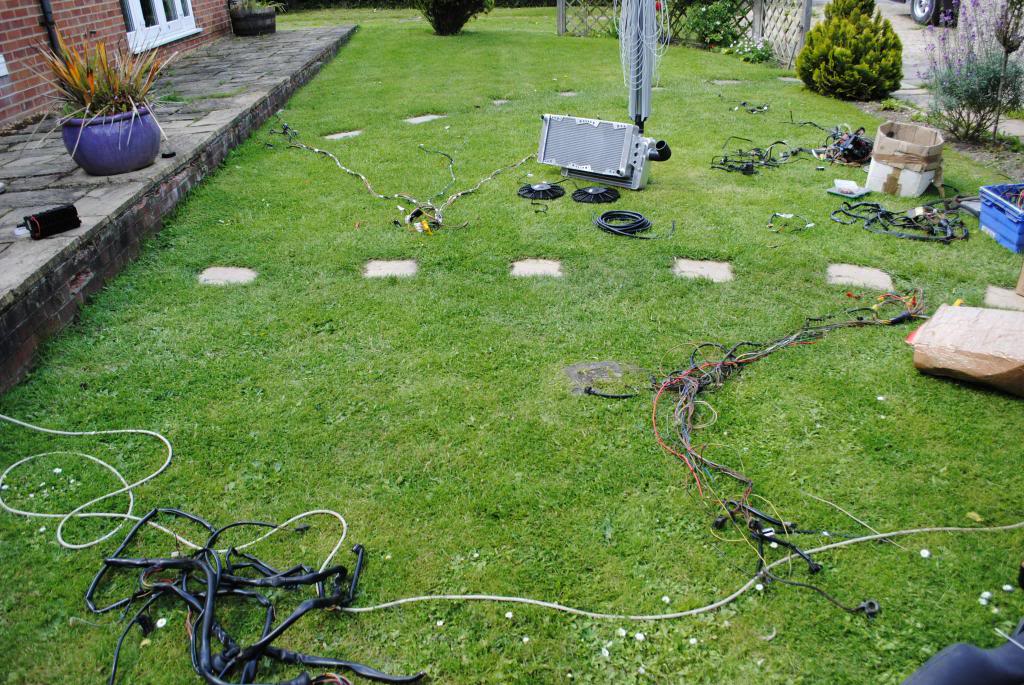  so the loom was fed down either chassis leg after being half loom taped from the fusebox to the front of the legs roughly, then i put it in some plastic flexable tubing and then black taped over that to keep it all dry, not that the chassis legs will ever hold water. so then this is just the engine loom running under the front panel and getting the correct lengths of wires to each plug, i done them one by one after adam giving me some lessons in cutting, soldering shrink wrapping so i was more confident as i hadnt done wiring before and just looking at it makes me cringe big time!   little work station with wiring joys 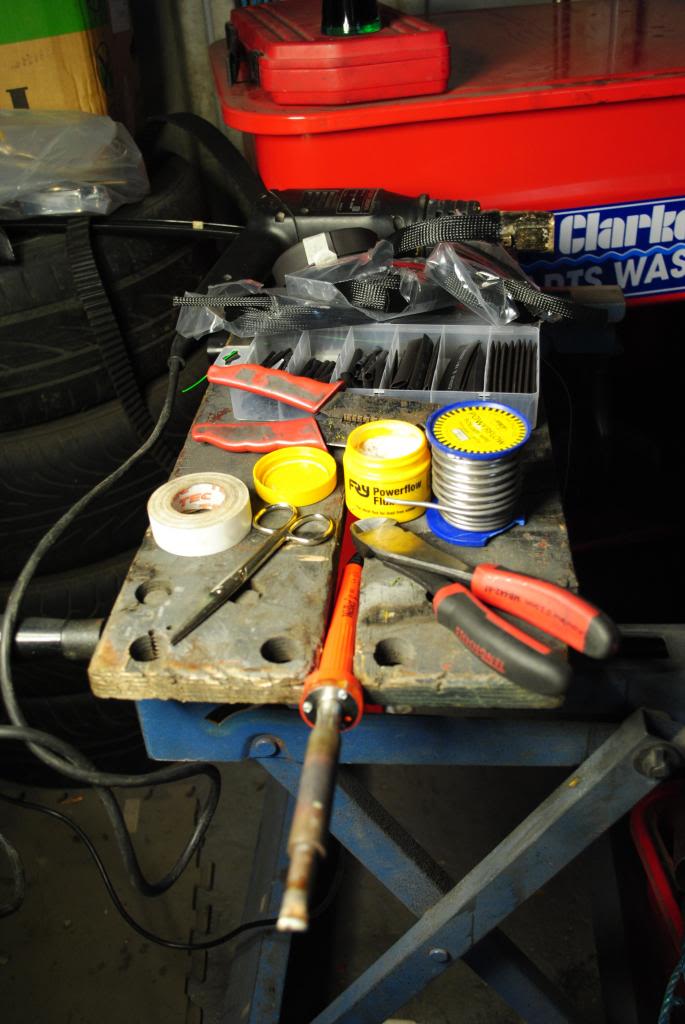 so i wanted to do something a little different with the wiring other than just a normal loom tape job, at work we use this kind of thing on our machines so i thought i would give it a go, it took 10 hours nearly to do the bay and light loom, also done the rad loom as you can see that through the top of my slam panel as i thought it was a cleaver idea to cut big holes in it. basically its a sheeve that you slide wires into, all black and a nice weave on the go, it does how ever need some thought on cutting plugs off, and getting all teh heat shrink on in order to close teh ends of the sheeving up once the plug end is soldered back on, i dont all this whilst making the wires longers and shorter. this is how theengine loom comes up through the front mount  | |
|
  | |
curtis_caddy

 Number of posts : 3070 Number of posts : 3070
Age : 33
Location : duxford
Drives : mk2 driver
Registration date : 2008-02-03
 |  Subject: Re: mk2 golf mtdi build-daily to be Subject: Re: mk2 golf mtdi build-daily to be  Sat Jan 12 2013, 10:13 Sat Jan 12 2013, 10:13 | |
| i forgot take a few step by step photos of the engine loom, i installed a boost gauge and later on a oil pressure gauge as the original one on the clocks was telling me i had then didnt have pressure. so first of all (same step with the wiring plugs) i used heat shrink to make the end of the wire/pipe look black. so imagen the plug soldered on, heat shrink fed upto the ends of the wires on teh plugs and heated up, by this time you would have put the correct length of sheeve over the wiring with an additional two piece of heat shrink to hold each end of the sheeve down, and dont forgot teh heat shrink under the sheeve to go over the wires you just soldered back together. Before you put the sheeve on you need to use a soldering ion to burn the ends to stop it from fraying  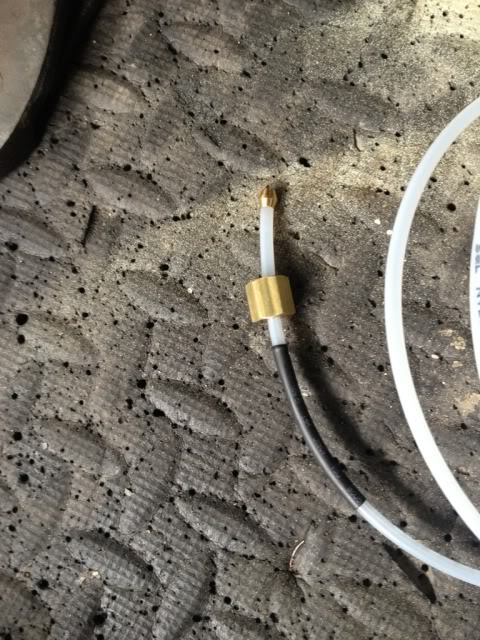 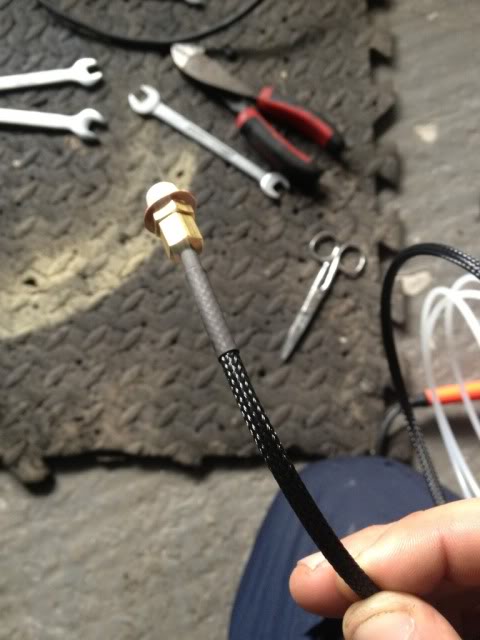 so one wire is simple once you get used to getting everything on before the plug. And yes I did have to unsolder plugs again! So with the boost gauge and oil pressure going into the car I wanted to run them together in the nay and into the car as one wire instead of two. So the boost line comes off above the head between inlet and the pump and the oil pressure at the side of the head, so are pretty close and flow together nicely, so this is where the "two into one wire" comes in. Basically a length oh sheeve and two more pieces of heat shrink, two wires fed into the one bigger piece of sheeve, heat shrink slid over the end of one piece of sheeve onto the two single pieces and then heated up. Then the other piece slid to the end of the wires and shrunk that end which ends up in the car.   | |
|
  | |
curtis_caddy

 Number of posts : 3070 Number of posts : 3070
Age : 33
Location : duxford
Drives : mk2 driver
Registration date : 2008-02-03
 |  Subject: Re: mk2 golf mtdi build-daily to be Subject: Re: mk2 golf mtdi build-daily to be  Sat Jan 12 2013, 10:28 Sat Jan 12 2013, 10:28 | |
|
Last edited by curtis_caddy on Sat Jan 12 2013, 10:50; edited 2 times in total | |
|
  | |
curtis_caddy

 Number of posts : 3070 Number of posts : 3070
Age : 33
Location : duxford
Drives : mk2 driver
Registration date : 2008-02-03
 |  Subject: Re: mk2 golf mtdi build-daily to be Subject: Re: mk2 golf mtdi build-daily to be  Sat Jan 12 2013, 10:41 Sat Jan 12 2013, 10:41 | |
| so thanks to chris getting my addicted to AN fittings, what started out as making some turbo feed and return lines turned into trying to keep everything black to match the sheeve on the wiring. ended up in my breather tank i wanted to make having weld on spout in AN males to mate with teh lines i planed on making. so obviously nothing comes with these fittings for this idea from vw, so i had stu at work weld on a steel fitting to the cam cover, anyone who knows the original cam cover has a ugly bracket and a filter stuck on top than breathes from block and cam cover and feeds into the inlet and fills it with shite. so teh breather tank works and looks pretty cool too. so the old bracket came off the cam cover with the spot rivet dips welded and smoothed, and the already existing hole from the breather having teh male fitting welded on.  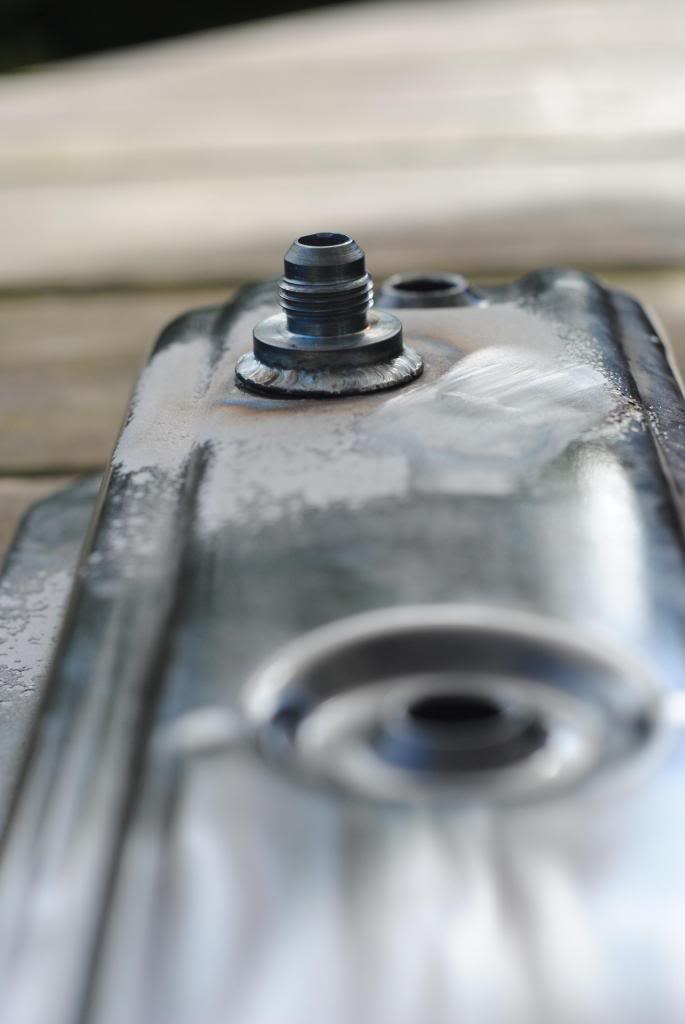 so that was pretty simple fix, next onto the block where the breather pipe would normaly come up and go to the head area, my pipe was already broken anyway. so i was going to have to buy a new one of those if i wanted to keep that set up. so i took measurements from the block end and made a plate up, amchined the O ring grove in it to seal it to the block like the original and got stu to weld an alloy AN male fitting here too, also gave it a plash of sattin black, looks factory to the un trained eye, the cam cover also ended up sattin black with an original deisel oil warning sticker going on.  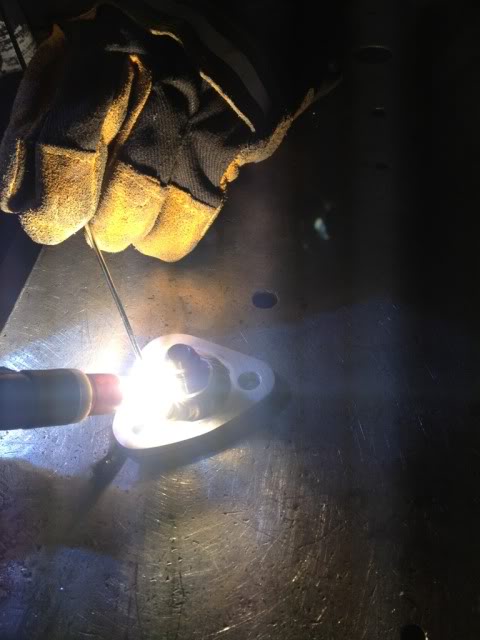  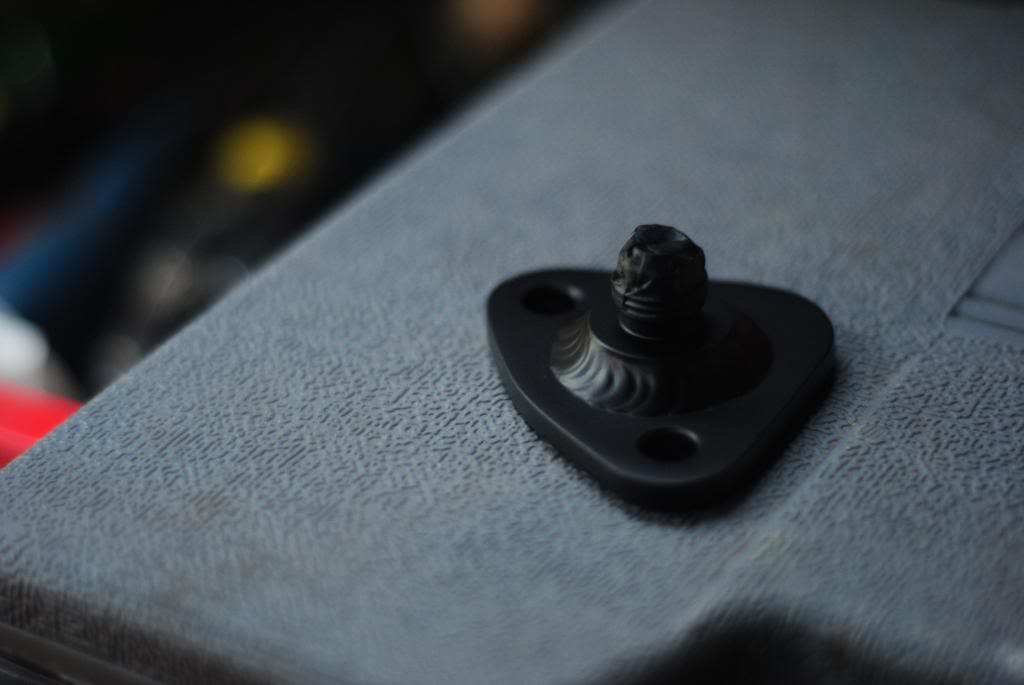 fitted to the block, also see teh AN fitting for the turbo oil feed 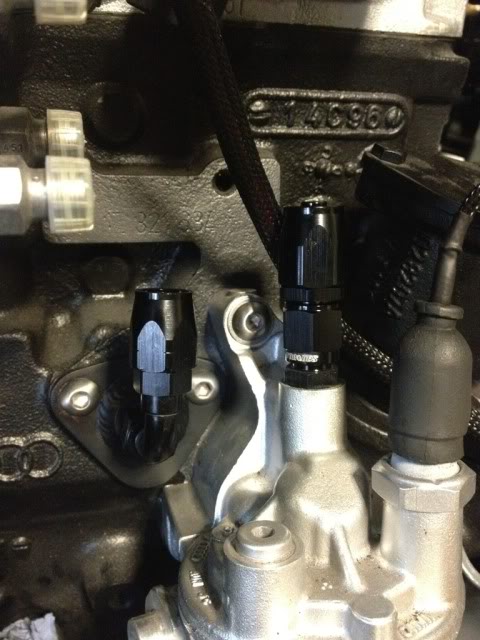 i didnt take many photos of making the breather and brackets, fitment etc so will get some soon as its back out the car again for clean anodising-  filters filters by the pinstriper, on Flickr | |
|
  | |
curtis_caddy

 Number of posts : 3070 Number of posts : 3070
Age : 33
Location : duxford
Drives : mk2 driver
Registration date : 2008-02-03
 |  Subject: Re: mk2 golf mtdi build-daily to be Subject: Re: mk2 golf mtdi build-daily to be  Sat Jan 12 2013, 11:12 Sat Jan 12 2013, 11:12 | |
| So what seems ages ago now the turbo, down pipe etc was all on, I sent the turbo off to have if inspected and wasn't up for boost pressures I wanted to run, and it worked out better to buy a unit that flowed so much better than the t3, but nothing was s direct fit. So dan made me an adaptor, ended up over an inch thick and in 316 stainless, all done on manual machines, and then I finished it off by porting each end to match the manifold and turbo, dan did take a lot of material out on the mill to save time or me. Think it took 6 hours between us. (I think I have posted photos of this before but here it is anyway) 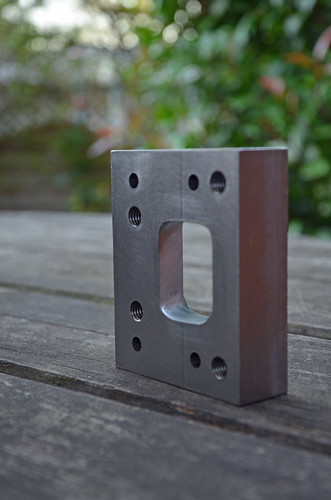 adaptor 2 adaptor 2 by the pinstriper, on Flickr  adaptor 2 adaptor 2 by the pinstriper, on Flickr So turbo mounting situation sorted, time for the old down pipe to get cut up, (had already painted and wrapped it) new flange on the garrett unit- I couldn't find an off the shelf 5 bolt flange for this anywhere even in America. So a few measurements and test pieces in alloy to make sure I got the holes in the correct place I marked up the only piece of 8mm steel I had to hand and set about making my own flange, to the and in a V band making the down pipe easy to come out if needed (and yeh it's had to come out due to turbo failure already) So here is some step by step photos of said flange-     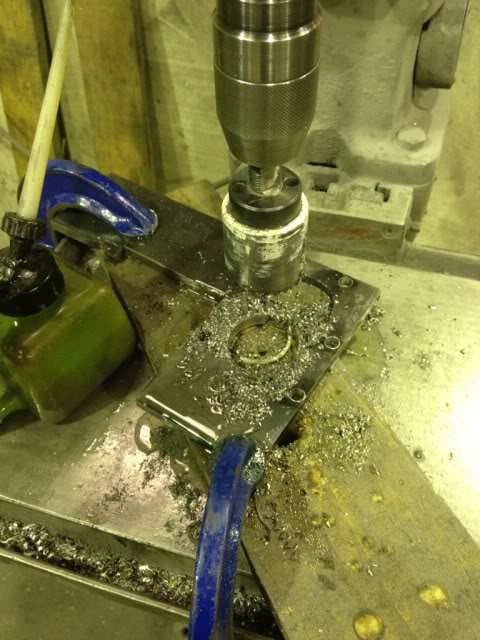  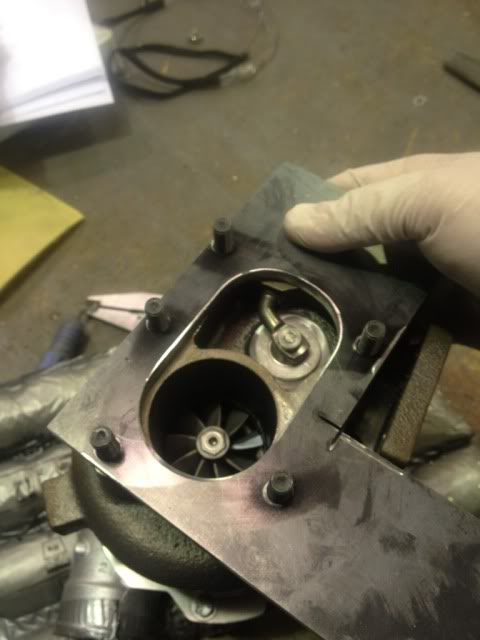  I got a cheap V band set up off eBay 2.5" to match the down pipe I made for the t3. I found the t3 down pipe with the simple square 4 bolt fixing tricky to get on and off over the studs on the turbo once it was in the car. So V band was good for fitment, and as you can see the holes in the flange are actually 2" not the 2.5" I needed. So I took a slice off a length of 2" steel tube I had, and started hammering it out to expand it upto 2.5" to mate with the v band. Due to the V band sitting heavily over to one side both ends had to be shapped different. I did manage to get both sides out of one piece which was super handy too 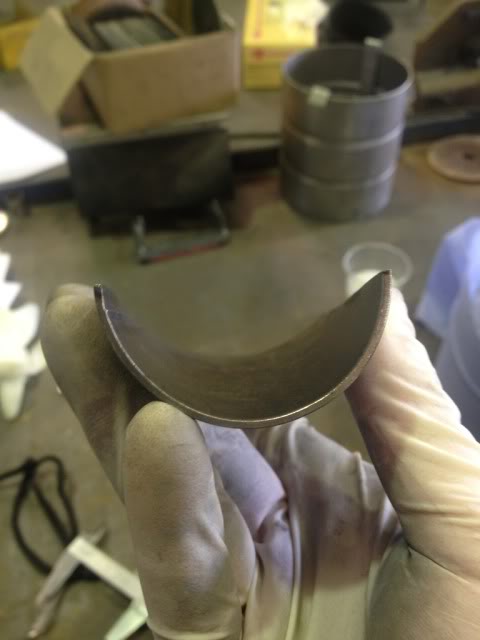  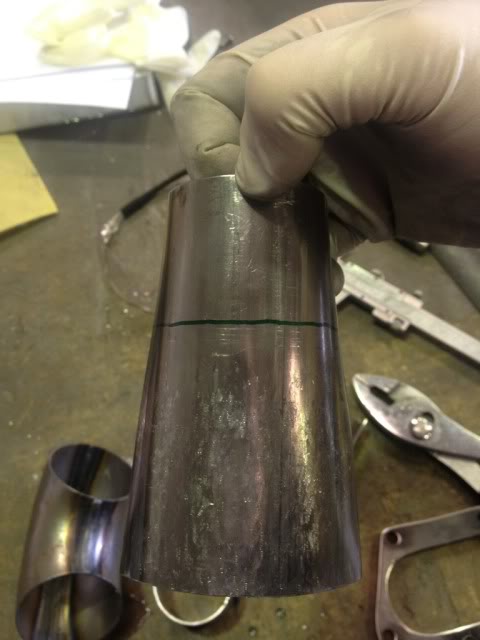  I take and finished cutting it in at home, back to work the following week for stu to weld up 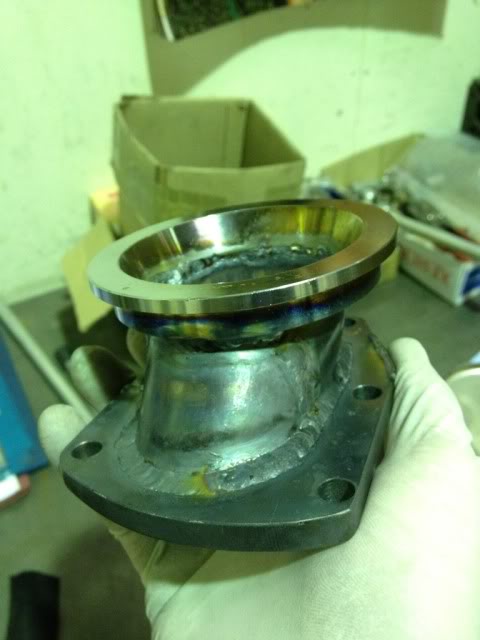 then i smootherd the insides out ready for coating, blasted it then sent it all off  flange flange by the pinstriper, on Flickr And then had it ceramic coated with the down pipe and exhaust manifold 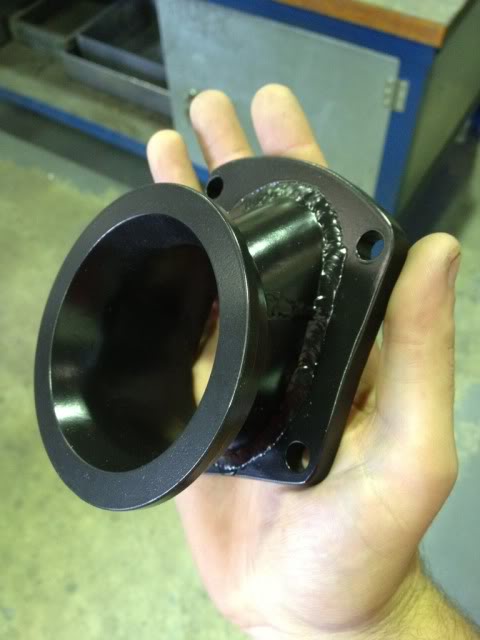 | |
|
  | |
caddyman

Number of posts : 1127
Age : 44
Location : sawston
Registration date : 2008-01-20
 |  Subject: Re: mk2 golf mtdi build-daily to be Subject: Re: mk2 golf mtdi build-daily to be  Sat Jan 12 2013, 12:14 Sat Jan 12 2013, 12:14 | |
| god i do love this car lol soon be done dude  | |
|
  | |
Sponsored content
 |  Subject: Re: mk2 golf mtdi build-daily to be Subject: Re: mk2 golf mtdi build-daily to be  | |
| |
|
  | |
| | mk2 golf mtdi build-daily to be |  |
|
